
How to Do a Dragon Braid in 8 Easy Steps
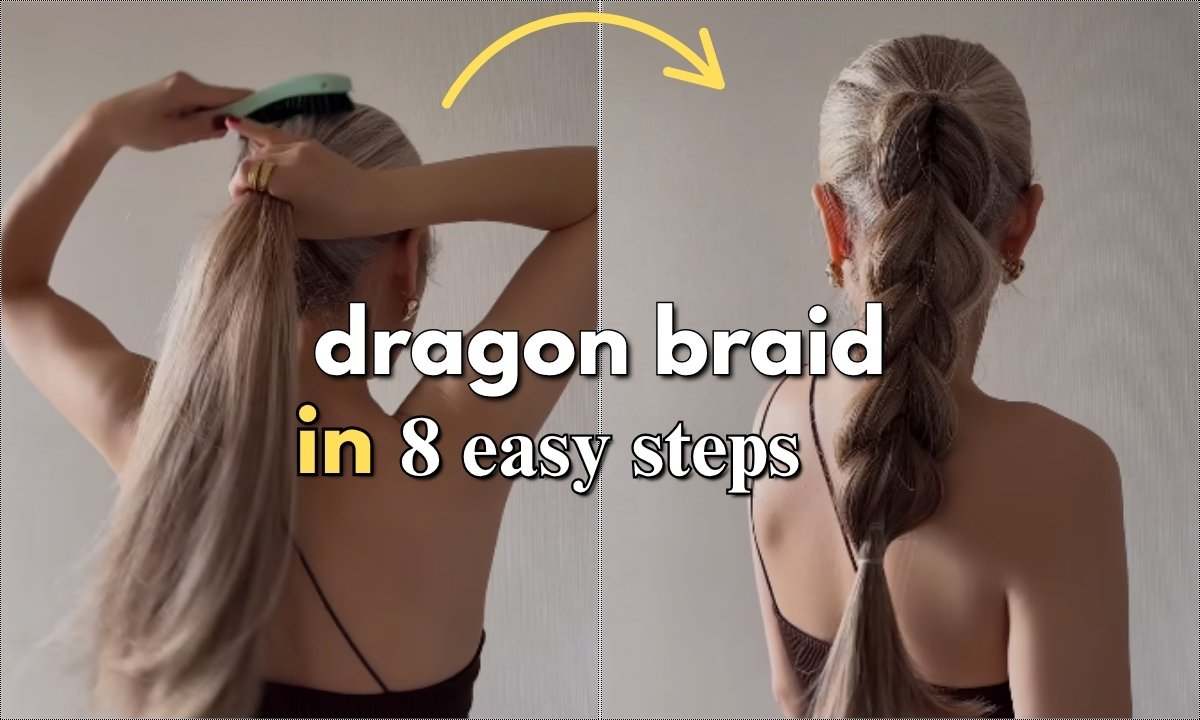
Are you trying a dragon braid for the very first time? Then don’t worry, this post is for you. It is too easy, but it feels a little bit tricky at the beginning.
It is possible that you have seen this eye-catching braid on social media and thought, ‘Seriously, how do they make it so perfect, smooth, and flawless?’
Maybe you have tried it by yourself, but it turned out to be a big mess.
The good news? With the right steps, tools and a little practice can make you perfect.
In this post, I will break down all the steps so you can create the cool, dragon – scale look without any stress.
Let’s dig in!
Contents
What Is a Dragon Braid and Why It’s Trending
A dragon braid is a bold, eye-catching and textured hairstyle that looks like a dragon scales running down the back of your head.
It was created by using the Dutch lace braid technique, where the braid is too close to the scalp.
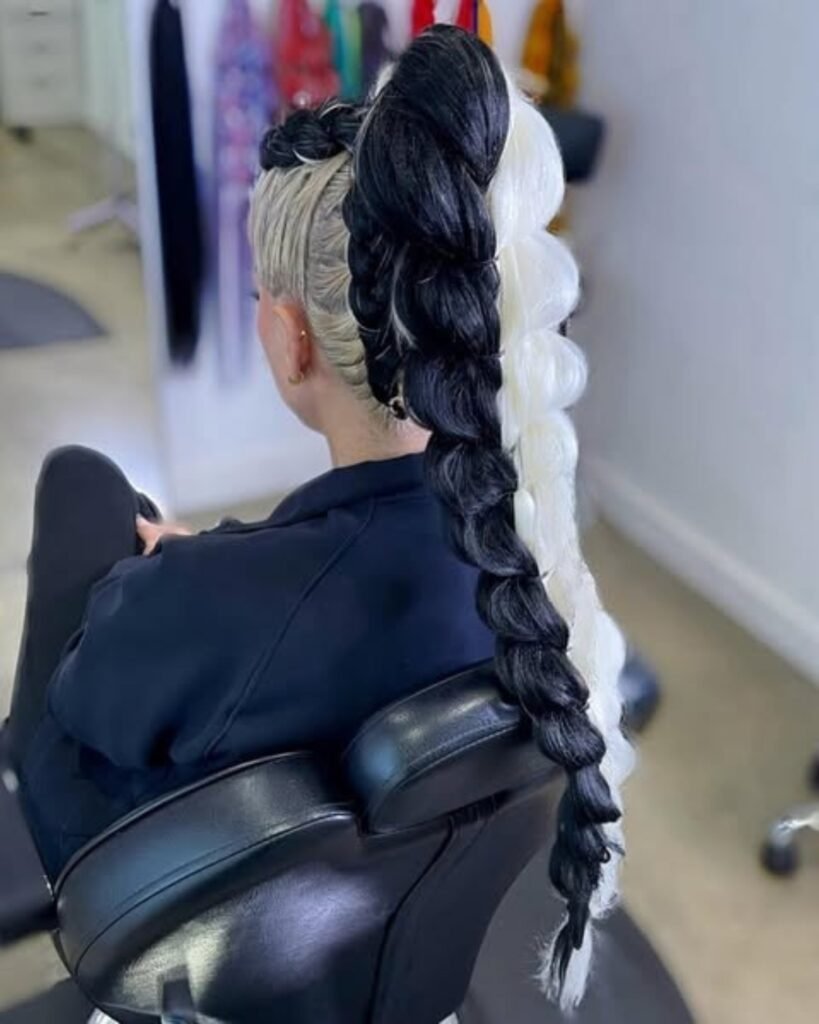
That is it what makes this hairstyle so popular and how it instantly adds volume to the regular braid.
This hairstyle can be perfect for those who want something fun and different.
Another great thing? It works on all kinds of hairs – short, long, curly, or straight – so anyone can rock in it.
Related: How to Do a Slick Back Bun Fast
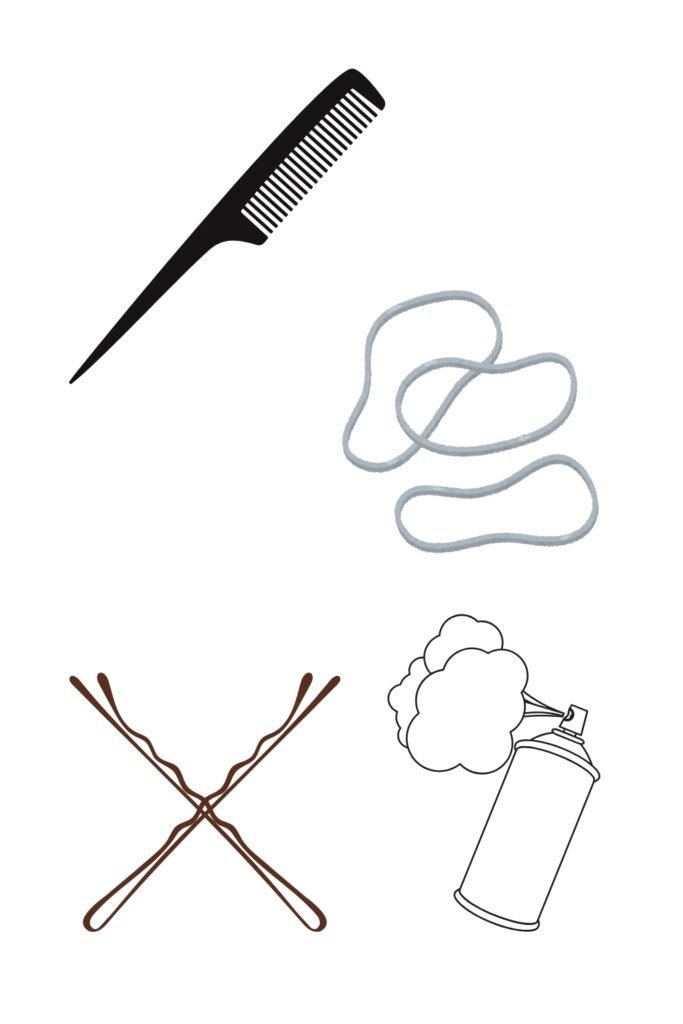
Tools and Products You’ll Need
If you want your dragon braid to stay very neat and last long, you will need some basic tools.
Begin with the rat tail comb because it helps you to divide the hair very neatly and accurately.
You will also need a few hair elastics to secure the ends of your braid and prevent it from unraveling.
Bobby pins are super helpful to keep the pulled-out braid sections, or “scales,” in place so they stay lifted and don’t lose their shape.
To keep your braid look neat and smooth, lightly mist it with the hairspray and a bit of texturizing spray to secure the flyaways.
Prepare Your Hair: Tips for Different Hair Types
1) Fresh Hair Needs Grip
Braiding in freshly washed hair? It might be soft to hold and stay in place. A quick use of dry shampoo to add some grip and prevent it from slipping.
2) Fine or Straight Hair
For fine and straight hairs, you will need some texture. Use some light hairspray or texturizing powder that gives your hair more grip so your braid stays in place.
3) Thick or Curly Hair
Dealing with the thick and curly hair? Use a wide – tooth comb to get out the tangles first, it will save you from headache.
To control frizz and make braiding easier use lightly mist with water and leave-in conditioner.
If you prepare your hair properly then your braid looks smoother , sharper and actually stays in place.
Related: How to Do a Messy Bun for Beginners
Step-by-Step Guide to Creating a Dragon Braid
Step 1: Part and Section Your Hair
Make a straight middle part of your hair with a rat – comb. Then, clip one side of your hair so you can tackle the other side easily.
Step 2: Start the Dutch Lace Braid
Start with a small section at the front of your hairline. Doing the Dutch braid by crossing the strands underneath.
As you go, add hair only to the outer sections and keep the braid more close to the scalp that is moving toward the back of your head.
Step 3: Overdirect the Braid
While braiding, when you add new pieces, pull the hair slightly toward your part. It will help them to sit smoother and make the sharp dragon shape braid.
Step 4: Pancake the Braid
Once you hit the bottom, pull the braid out a bit on the sides to make it wider and flatter.
This ‘pancaking’ technique adds some volume and gives the signature look to the braid.
Step 5: Secure the End
Now, you will just finish it like the regular braid that is with three strands.
Once you are done, pancake it a bit for some volume and then secure the ends with a small elastic.
Step 6: Repeat on the Other Side
Now, unclip the other slide of your hair and repeat the same steps from step 2 to step 5 to create the second Dutch lace braid.
Step 7: Combine and Pin the Braids
When your braids meet at the nape of your neck, tie them together.
Then, fluff out some sections and secure it with bobby pins to get them cool and dragon scale vibe.
Step 8: Set the Style
Give your braid a quick hair spray to lock it in and keep flyways under control.
How to Safely Remove the Dragon Braid?
Here’s few steps you can follow to remove this dragon braid:
1) Spray Detangler or Leave-In Conditioner
Before you take your braid out, spray your hair with detangler or use some leave-in conditioner which helps to soften the knots and protect your hair from breakage.
2) Remove Hair Elastics Carefully
No yanking! Take out the hair ties slowly. You want to keep things smooth and prevent your hair from breakage.
3) Unravel the Braid Slowly
Use your fingers to lose the braids one strand at a time. If you run into a knot, grab the wide – tooth comb to work more smoothly.
4) Detangle Hair Thoroughly
After you take the braid out, use a wide – comb to gently smooth the hairs and get rid of any leftover knot.
5) Apply Deep Conditioner or Hair Mask
At last, apply a hair mask to rehydrate your hair and fix any damage from tight braiding.
Related: How to Do a Slick Back Ponytail Like a Pro
Conclusion: Encouragement and Final Tips
A dragon braid needs some practice to get it perfect. Follow these steps very carefully, prepare your hair very well and be patient.
If it is not perfect at your first try then keep trying it. With the use of the right tools and products, the braid looks neat and more secure.
With time, you will be able to do the best dragon braid quickly and confidently.